この記事では Pixi.jsを使ってブラウザで動く簡単な2Dゲームを作ってみたいと思います。 爆弾を設置して敵を倒す、某爆弾男ゲームのようなシステムを作ってみようかと。 あくまで簡易的な。
の続きです。 仕事納めで時間ができたので、一気に3本更新できました。
今回のDEMO。
あまり人様に見せられるコードは書いていませんが、 修行だと思って公開しています。 vol.3 完了時のコードは下記に。 bomber_maid [Branch: pixi-game-03]
OUTLINE
- リファクタリング
- ゲームステージを生成する
- グリッドを描画
- 床を描画
- ブロックを描画
リファクタリング
とりあえずモジュール分割等したものを以下に。ちょっと長いです。
index.js はエントリーポイントになります。
index.js
/**
 * @fileoverview BOMBER MAID
*/

'use strict';

require('pixi.js');

/**
 * @namespace
 */
var BOMBER_MAID = BOMBER_MAID || {};

/**
 * @namespace BOMBER_MAID_OBJECT
 * @memberof BOMBER_MAID
 */
BOMBER_MAID.BOMBER_MAID_OBJECT = {
  init: function () {

    var
    Config       = require('./Config'),
    Character    = require('./Character'),
    Controller   = require('./Controller'),
    Stage        = require('./Stage'),

    /**
     * ローダーを生成
     */
    loader = new PIXI.loaders.Loader();

    /**
     * 画像の読み込み
     */
    loader
    .add('sprite', './_assets/img/sprite.json')
    .once('complete', function(){
      new Stage();
      Config.character  = new Character();
      Config.controller = new Controller();
    });

    /**
     * 読み込む
     */
    loader.load();

  }
};

BOMBER_MAID.BOMBER_MAID_OBJECT.init();
続いて、 pixi.js の根幹となる Stage のモジュールです。
Stage.js
/**
 * @fileoverview Stage
 * @constructor
 */

'use strict';

// ================
//     MODULE
// ================

var Config = require('./Config');

// ================
//   CONSTRUCTOR
// ================

var Stage = function () {

  this._init.apply(this);

};

module.exports = Stage;

// ================
//     CONSTANT
// ================

Stage.STAGE_HTML_ID = 'stage';

// ================
//      METHOD
// ================

/**
 * 初期化
 * @method _init
 */
Stage.prototype._init = function () {

  this._generateStage();
  this._rendering();

};

/**
 * ステージの生成
 * @method _generateStage
 */
Stage.prototype._generateStage = function () {

  PIXI.utils.skipHello();

  Config.stage = new PIXI.Container();
  this.renderer = PIXI.autoDetectRenderer(Config.WIDTH, Config.HEIGHT, {
    transparent: true,
    antialias:   true
  });

  document.getElementById(Stage.STAGE_HTML_ID).appendChild(this.renderer.view);

  this.renderer.render(Config.stage);

  Config.subStage      = new PIXI.Container();
  Config.stage.addChild(
    Config.subStage
  );
};

/**
 * レンダリング
 * @method _rendering
 */
Stage.prototype._rendering = function () {
  var animation = function () {

    requestAnimationFrame(animation);
    this.renderer.render(Config.stage);

  }.bind(this);

  animation();

};
Character(この場合プレイアブルキャラクター)のモジュールです。
Character.js
/**
 * @fileoverview Character
 * @constructor
 */

'use strict';

// ================
//     MODULE
// ================

var Config = require('./Config');


// ================
//   CONSTRUCTOR
// ================

var Character = function () {

  /**
   * キャラクターアニメーション要素の配列
   */
  this._elmAnimationCharacter = [];

  /**
   * キャラクター要素
   */
  this._elmCharacter = new PIXI.Container();

  this._init.apply(this);

};

module.exports = Character;


// ================
//     CONSTANT
// ================

Character.ANIMATION_FRAME     = 4; // 4フレーム
Character.ANIMATION_DIRECTION = 4; // 4方向
Character.DEFAULT_DIRECTION   = 3; // Left: 0, Up: 1, Right: 2, Down: 3


// ================
//      METHOD
// ================

/**
 * 初期化
 * @method _init
 */
Character.prototype._init = function () {

  var
  /**
   * テクスチャの配列(Left: 0, Back: 1, Right: 2, Front: 3)
   */
  ttCharacter = [],
  i, j;


  /**
   * キャラクターアニメーション要素の生成
   */
  for (i = 0; i < Character.ANIMATION_DIRECTION; i++) {
    ttCharacter[i] = [];

    for (j = 0; j < Character.ANIMATION_FRAME; j++) {
      var frame = j === 0 ? 0:
                  j === 1 ? 1:
                  j === 2 ? 0:
                  j === 3 ? 2:
                  0;
      ttCharacter[i].push(PIXI.Texture.fromFrame('character-' + i + '-' + frame));
    }

    this._elmAnimationCharacter.push(new PIXI.extras.AnimatedSprite(ttCharacter[i]));
    this._elmAnimationCharacter[i].play();
    this._elmAnimationCharacter[i].animationSpeed = 0.1;
    this._elmAnimationCharacter[i].anchor.set(0.5, 1);
    this._elmAnimationCharacter[i].visible = false;
    this._elmCharacter.addChild(this._elmAnimationCharacter[i]);
  }

  /**
   * 初期方向設定
   */
  this._elmAnimationCharacter[Character.DEFAULT_DIRECTION].visible = true;

  /**
   * 初期位置設定
   */
  this._elmCharacter.position.set(Config.WIDTH_HALF, Config.HEIGHT_HALF);

  Config.subStage.addChild(this._elmCharacter);

};

/**
 * キャラクターの移動
 * @method move
 */
Character.prototype.move = function (direction) {

  var i,

  /**
   * 全てのアニメーションを非表示
   */
  hideAnimation = function () {
    for (i = 0; i < Character.ANIMATION_DIRECTION; i++) {
      this._elmAnimationCharacter[i].visible = false;
    }
  }.bind(this),

  /**
   * 移動を制限
   */
  restrictMovement = function () {
    if (this._elmCharacter.x - 40 <= 0) {
      this._elmCharacter.x = 40;
    } else if (this._elmCharacter.x + 40 >= Config.WIDTH) {
      this._elmCharacter.x = Config.WIDTH - 40;
    }

    if (this._elmCharacter.y - 80 <= 0) {
      this._elmCharacter.y = 80;
    } else if (this._elmCharacter.y >= Config.HEIGHT) {
      this._elmCharacter.y = Config.HEIGHT;
    }
  }.bind(this);

  /**
   * 表示切り替え & 移動
   */
  switch (direction) {
    case 'left':
      hideAnimation();
      this._elmAnimationCharacter[0].visible = true;
      this._elmCharacter.position.x -= 4;
      restrictMovement();
      break;
    case 'up':
      hideAnimation();
      this._elmAnimationCharacter[1].visible = true;
      this._elmCharacter.position.y -= 4;
      restrictMovement();
      break;
    case 'right':
      hideAnimation();
      this._elmAnimationCharacter[2].visible = true;
      this._elmCharacter.position.x += 4;
      restrictMovement();
      break;
    case 'down':
      hideAnimation();
      this._elmAnimationCharacter[3].visible = true;
      this._elmCharacter.position.y += 4;
      restrictMovement();
      break;
    default:
      break;
  }

  return 0;

};
Controller モジュールです。 名前があまりよくないですね。 この場合ユーザの操作的な意味です。
Controller.js
/**
 * @fileoverview Controller
 * @constructor
 */


'use strict';


// ================
//     MODULE
// ================

var Config = require('./Config');


// ================
//   CONSTRUCTOR
// ================

var Controller = function () {

  this._init.apply(this);

};

module.exports = Controller;


// ================
//     CONSTANT
// ================

Controller.KEY_QTY   = 256;
Controller.KEY_LEFT  = 37;
Controller.KEY_UP    = 38;
Controller.KEY_RIGHT = 39;
Controller.KEY_DOWN  = 40;

// ================
//      METHOD
// ================

/**
 * 初期化
 * @method _init
 */
Controller.prototype._init = function () {

  var i;

  /**
   * キーの状態を保存
   * true: 押されている, false: 押されていない
   */
  this._keyStatus = new Array(Controller.KEY_QTY);

  for (i = 0; i < Controller.KEY_QTY; i++) {
    this._keyStatus[i] = false;
  }

  /**
   * キーボードが押されたイベント
   */
  document.addEventListener('keydown', function (e){
    this._keyStatus[e.keyCode] = true;
  }.bind(this), false);
  document.addEventListener('keyup', function (e){
    this._keyStatus[e.keyCode] = false;
  }.bind(this), false);

  this._checkInput();

};


/**
 * 入力を常時監視
 * @method _checkInput
 */
Controller.prototype._checkInput = function () {

  /**
   * 矢印キーのチェック
   */
  var check = function () {
    requestAnimationFrame(check);

    if (this._keyStatus[Controller.KEY_LEFT]) {
      Config.character.move('left');
    }
    if (this._keyStatus[Controller.KEY_UP]) {
      Config.character.move('up');
    }
    if (this._keyStatus[Controller.KEY_RIGHT]) {
      Config.character.move('right');
    }
    if (this._keyStatus[Controller.KEY_DOWN]) {
      Config.character.move('down');
    }
  }.bind(this);

  check();

};
最後に Config モジュールです。
Config.js
/**
 * @fileoverview 変数
 */


'use strict';


var Config = require('./Config');


module.exports = Config;

/**
 * 色の管理
 */
Config.COLOR_YELLOW = 0xffff00;
Config.COLOR_RED    = 0xff0000;
Config.COLOR_WHITE  = 0xffffff;

/**
 * stage の幅
 * @constant
 */
Config.WIDTH       = 1280;
Config.WIDTH_HALF  = 1280 / 2;

/**
 * stage の高さ
 * @constant
 */
Config.HEIGHT      = 768;
Config.HEIGHT_HALF = 768 / 2;

/**
 * ユニットサイズ
 * @constant
 */
Config.UNIT_SIZE = 64;

/**
 * ブロック数
 * @constant
 */
Config.VERTICAL_UNIT   = Config.HEIGHT / Config.UNIT_SIZE; // 12
Config.HORIZONTAL_UNIT = Config.WIDTH / Config.UNIT_SIZE; // 20
前回から数値など一部変更しています。
ゲームステージを生成する
マップチップは、自作ドット絵のデータが Google Drive から発掘できたのでそれを使います。
グリッドを描画
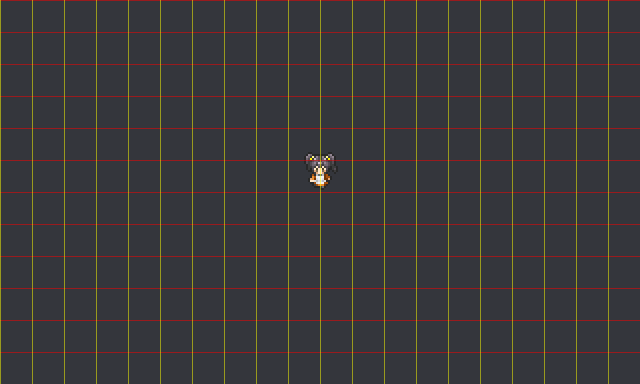
Stage だと被るので、 ここではゲームステージ = Scene とします。 Scene はマップチップのユニットを並べて構成されます。 canvas のサイズを 1280 × 768 px としているので、 ユニットのサイズを 64px (20ブロック × 12ブロック)とします。 (高さは可変するかも)
まず、開発しやすいようにグリッドを描画します。 PIXI.Graphics() を使うと、 矩形や円、線、多角形を描画することが出来ます。 インスタンス変数、alpha で透明度を下げています。
Debug.js
  //   ・
  //   ・
  //   ・

  var verticalLine = [],
      horizontalLine = [],
      debugStage = new PIXI.Container(),
      i;

  /**
   * 水平ライン
   */
  for (i = 0; i < Config.VERTICAL_UNIT; i++) {
    verticalLine.push(new PIXI.Graphics().beginFill(Config.COLOR_RED).drawRect(0, 0, Config.WIDTH, 1));
    verticalLine[i].position.set(0, Config.UNIT_SIZE * i);
    debugStage.addChild(verticalLine[i]);
  }

  /**
   * 垂直ライン
   */
  for (i = 0; i < Config.HORIZONTAL_UNIT; i++) {
    horizontalLine.push(new PIXI.Graphics().beginFill(Config.COLOR_YELLOW).drawRect(0, 0, 1, Config.HEIGHT));
    horizontalLine[i].position.set(Config.UNIT_SIZE * i, 0);
    debugStage.addChild(horizontalLine[i]);
  }

  debugStage.alpha = 0.5;
  Config.stage.addChild(debugStage);

  //   ・
  //   ・
  //   ・
このグリッドにそってマップチップユニットを置いていきます。
床を描画
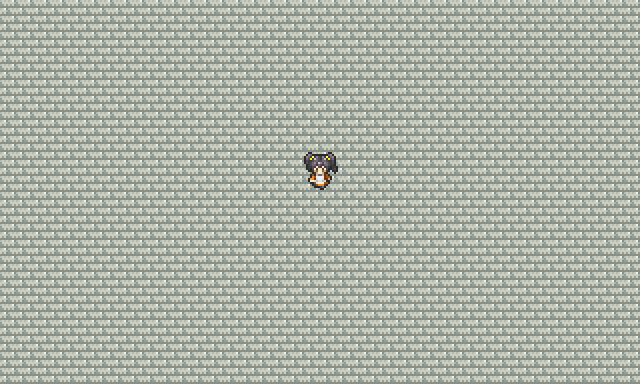
ベースとなる床を敷き詰めます。
Scene.js
  //   ・
  //   ・
  //   ・

  var i,
      j,
      ttMapchip = [];

  for (i = 0; i < Scene.MAPCHIP_QTY; i++) {
    ttMapchip.push(PIXI.Texture.fromFrame('map-' + i));
  }

  for (i = 0; i < Config.HORIZONTAL_UNIT; i++) {
    for (j = 0; j < Config.VERTICAL_UNIT; j++) {
      var spr = new PIXI.Sprite(ttMapchip[0]);
      spr.position.set(Config.UNIT_SIZE * i, Config.UNIT_SIZE * j);
      Config.mapStage.addChild(spr);
    }
  }

  //   ・
  //   ・
  //   ・
だんだんそれっぽくなっていく感じ。楽しい。
ブロックを描画
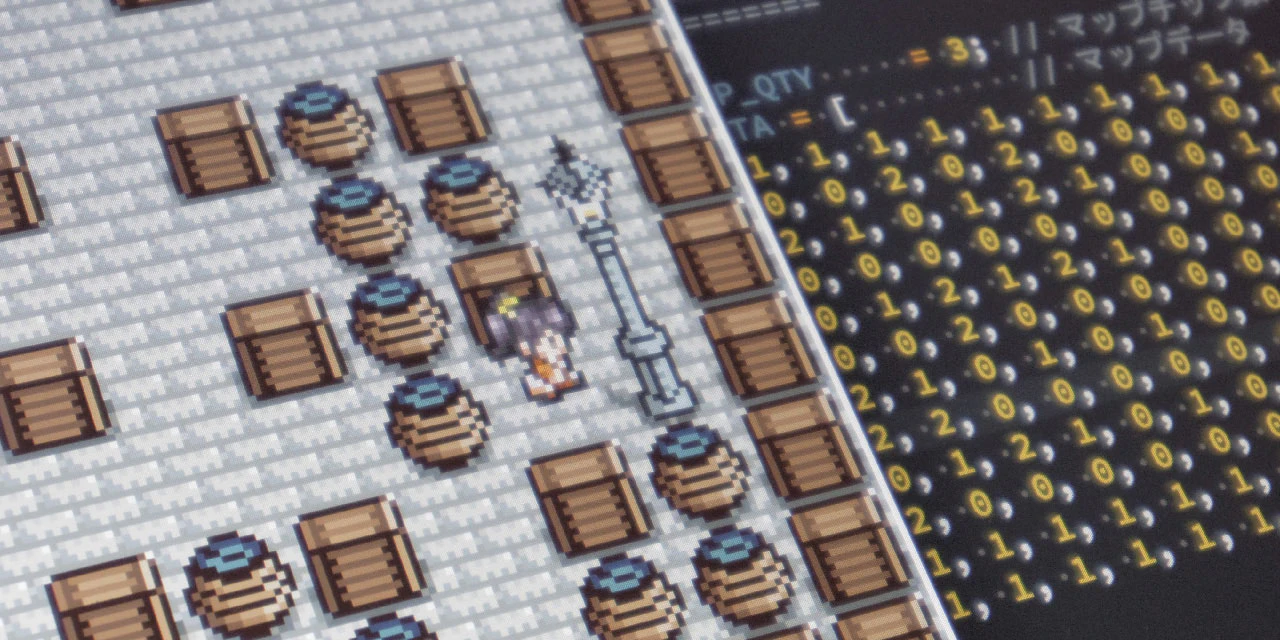
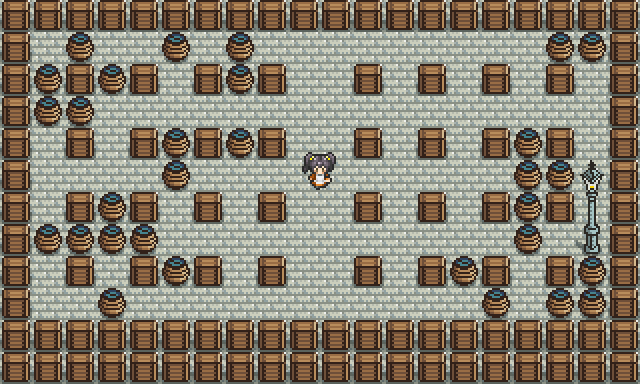
ブロックは爆風で壊せる ソフトブロック と、壊れない ハードブロック が必要になりますがそれは後ほど。 マップデータは2次元配列にマップチップIDを格納して管理します。 0 → 何も置かない、 1 → 木箱、 2 → 樽 という感じ。
Scene.js
  //   ・
  //   ・
  //   ・

Scene.MAPCHIP_QTY     = 3; // マップチップ数
Scene.MAP_DATA = [         // マップデータ
  [1, 1, 1, 1, 1, 1, 1, 1, 1, 1, 1, 1, 1, 1, 1, 1, 1, 1, 1, 1],
  [1, 0, 2, 0, 0, 2, 0, 2, 0, 0, 0, 0, 0, 0, 0, 0, 0, 2, 2, 1],
  [1, 2, 1, 2, 1, 0, 1, 2, 1, 0, 0, 1, 0, 1, 0, 1, 0, 1, 0, 1],
  [1, 2, 2, 0, 0, 0, 0, 0, 0, 0, 0, 0, 0, 0, 0, 0, 0, 0, 0, 1],
  [1, 0, 1, 0, 1, 2, 1, 2, 1, 0, 0, 1, 0, 1, 0, 1, 2, 1, 0, 1],
  [1, 0, 0, 0, 0, 2, 0, 0, 0, 0, 0, 0, 0, 0, 0, 0, 2, 2, 0, 1],
  [1, 0, 1, 2, 1, 0, 1, 0, 1, 0, 0, 1, 0, 1, 0, 1, 2, 1, 0, 1],
  [1, 2, 2, 2, 2, 0, 0, 0, 0, 0, 0, 0, 0, 0, 0, 0, 2, 0, 0, 1],
  [1, 0, 1, 0, 1, 2, 1, 0, 1, 0, 0, 1, 0, 1, 2, 1, 0, 1, 2, 1],
  [1, 0, 0, 2, 0, 0, 0, 0, 0, 0, 0, 0, 0, 0, 0, 2, 0, 2, 2, 1],
  [1, 1, 1, 1, 1, 1, 1, 1, 1, 1, 1, 1, 1, 1, 1, 1, 1, 1, 1, 1],
  [1, 1, 1, 1, 1, 1, 1, 1, 1, 1, 1, 1, 1, 1, 1, 1, 1, 1, 1, 1]
];


  //   ・
  //   ・
  //   ・

  var i,
      j,
      ttMapchip = [];

  for (i = 0; i < Scene.MAPCHIP_QTY; i++) {
    ttMapchip.push(PIXI.Texture.fromFrame('map-' + i));
  }

  for (i = 0; i < Config.HORIZONTAL_UNIT; i++) {
    for (j = 0; j < Config.VERTICAL_UNIT; j++) {
      var spr = new PIXI.Sprite(ttMapchip[0]);
      spr.position.set(Config.UNIT_SIZE * i, Config.UNIT_SIZE * j);
      Config.mapStage.addChild(spr);
      var spr2 = new PIXI.Sprite(ttMapchip[Scene.MAP_DATA[j][i]]);
      spr2.position.set(Config.UNIT_SIZE * i, Config.UNIT_SIZE * j);
      Config.mapStage.addChild(spr2);
    }
  }

  //   ・
  //   ・
  //   ・
anchor は PIXI.DisplayObject の基準点を設定するインスタンス変数で、 anchor.set(0.5, 1) とすることで、マップチップ下部に基準点を設定し、下の画像の街灯のように高さのあるマップチップも違和感なく配置することができます。 樽とか街灯とかRPGのマップチップなので、あまり爆弾ゲームの雰囲気が出てないですね。
残タスク
- 通行可 / 不可
- マップ、キャラクター、その他オブジェクトの奥行き関係
- 爆弾の設置
- 爆発
- ソフトブロックの破壊
- キャラクターのミス
- 敵の配置
- GUI、演出
残タスクはこんなところでしょうか。 モジュール分割で一気に書きやすくなった感じ。 この書き方が正しいかはわからんけども……。
vol.3はここまで。 続きは Pixi.js でゲームを作ってみる vol.4 から。